
Common Problems When Growing Microgreens

So you don't have green fingers? Swore never to plant a seed again because every time you did, your microgreens turned out infected with mould or fungus or never saw the light of day? Don't give up just yet. Below, we go through some common problems you may have encountered while planting your microgreens. Don't worry, they are all problems we have gone through as well. Give it another shot - after all, like cooking, plant cultivation is about trying, finding out what works, and trying again. By the end of it, you will have an edible garden right at your fingertips!
1. Mould or Fungus
The first thing is to determine if what you see is indeed mould. If you may notice a white fuzzy growth around the roots of your seedlings, this is not mould. It is root hairs and is part of the natural process of germination and growth. There is a distinct difference between root hairs and mould. Root hair is light and typically surrounds the root area. Mould is darker, heavier and covers bare soil or the surrounding seeds.
Mould thrive in certain conditions: high humidity, lack of circulation, unclean trays/pots.
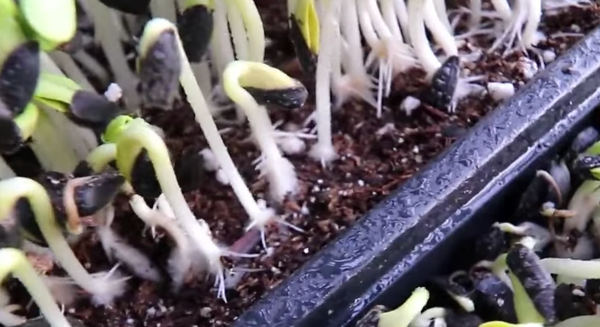
This is white fuzz on microgreen roots
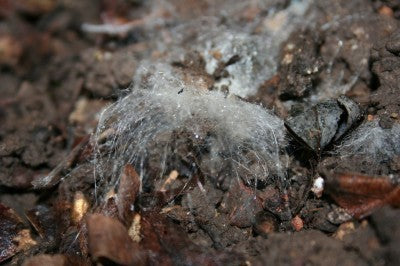
This is mould which is usually found on soil or surrounding seeds
Remedy for Mould
- The first thing is to ensure that the tray you are using to germinate your seeds is thoroughly washed and clean.
- Good ventilation prevents high humidity, although this might be difficult during the blackout period.
- Do not over seed your tray. Except for our pea packs, most of our other variety of seed packs are good for 2-4 sowings (based on our starter pack tray).
- The above tips are to prevent mould from forming in your trays. If, however, you do encounter mould when you uncover your tray, remove the section that is infected with mould. If the entire tray is infected, then you should discard the tray and start over.
2. Slow Germination
Once you have sowed your seeds, germination for most seeds should take between 2-4 days (unless otherwise stated on our seed variety pages). If it is taking longer, take a peek into your tray (it should be blacked out during this stage). If the seeds or potting mix is too dry, spray with water to increase moisture.
3. Uneven Growth
There will be times when your tray of microgreens are perfectly even, like well mowed grass, but other times when the growth in uneven. This could be due to several reasons:
- How well you spread the seeds when sowing. With tiny seeds like amaranth, basil, broccoli, there is a tendency to over populate the tray. Use a seed feeder like a herb bottle with a dispensing cap. This will allow you to control the spread and ensure that your seeds are evenly sowed.
- The quality of your potting mix. While most potting mix work well with microgreens, there are the odd ones that sometimes don't work. We use a potting mix that has worked well for us. Alternatively, try different ones until you find one that works best for you.
- Placement of your tray. It is important to ensure that your entire tray receives equal treatment of shade and light during and after the germination period.
4. Yellowish Greens/Spindy Stems

During germination, when you remove the tray from its black-out period, the microgreens will look yellowish. This is because it has not been exposed to sunlight and the photosynthesis process has not started. Once you expose your tray to the sun, your microgreens will start to turn green.
Spindy stems are often the result of keeping your tray covered longer then the required period. There are other contributors too - like the lack of moisture control and proper seed preparation. The best way to avoid this:
- Keep a routine of when you water your microgreens, whether it is once or twice a day. Ensure that you water the roots, rather then just spraying the top of the microgreens
- Check that your microgreens are given the correct black out period.
5. Cracks in soil
Soil shifts when trays are moved around and deep crevasses may form if there is uneven support in carrying your trays. There is nothing wrong with this. Your seeds will germinate as usual.
6. Limping looking greens after harvesting
Microgreens are delicate and must be taken care of after harvesting. We recommend that you harvest your greens when you want to use them. If you are thinking of storing them, note that with the hot and humid climate in Singapore, your cut microgreens are not likely to last very long. But if you must store, keep your greens in a tightly sealed container, preferable a glass or mason jar. Plastic tends to emit heat so it is not recommended for storage.
This pretty much covers the most common problems faced when first starting your microgreens garden. We're happy to address any other concerns you have. Remember, practice makes perfect, so have a go and enjoy your new hobby!